How to Know If a Charge Controller is Faulty | Easy Methods
The charge controller plays a crucial role in protecting your battery’s health and longevity. It regulates the flow of electricity from your solar panels to your batteries, preventing overcharging and undercharging. Without a properly functioning charge controller, your entire solar setup could be at risk.
Understanding the signs of a faulty charge controller is essential for maintaining your solar power system’s efficiency and preventing costly damage. In this article, we’ll explore the telltale signs of controller malfunction, walk through diagnostic steps, and provide actionable advice for troubleshooting and maintenance.
Signs of a Faulty Charge Controller
Battery Issues
One of the most common indicators of a faulty charge controller is unusual battery behavior. If you notice your batteries aren’t holding a charge as well as they used to, or if they seem to be draining unusually quickly, your charge controller might be the culprit.
1. Undercharging or Not Charging
If your batteries consistently show low voltage, even during peak sunlight hours, your charge controller may not be doing its job. Use a multimeter to check your battery voltage. For a 12V system, a healthy, fully charged battery should read between 12.6 and 12.8 volts.
2. Overcharging
On the flip side, overcharging can be just as problematic. If your batteries are consistently reading above 14.4 volts (for a 12V system), your charge controller might be failing to regulate the incoming charge properly. Overcharging can lead to reduced battery life, overheating, and in extreme cases, even fire.
3. Inconsistent Charging
Fluctuating voltage readings throughout the day, beyond what’s normal for varying sunlight conditions, could indicate a charge controller struggling to maintain consistent output.
Controller Malfunction Indicators
Modern charge controllers often come equipped with LED indicators or digital displays that can provide valuable information about their status.
1. No Output
If your charge controller shows no signs of life – no lights, no display – it may have failed completely. However, before jumping to conclusions, ensure it’s receiving power from the solar panels and that all connections are secure.
2. Error Codes
Many controllers display error codes when they detect issues. Consult your manual to understand what these codes mean for your specific model.
Unusual Symptoms
Keep an eye (and ear) out for these additional signs of trouble:
- Inconsistent or non-functional LED indicator lights
- Strange noises or vibrations coming from the controller
- Signs of physical damage or overheating, such as discoloration or warping of the casing
Troubleshooting Steps for Faulty Charge Controllers
Before declaring your charge controller faulty, it’s wise to rule out other potential issues.
1. Visual Inspection
Start with a thorough visual inspection of your solar power system:
- Check all connections for tightness and signs of corrosion.
- Examine wires for any damage, particularly if your system is exposed to the elements.
- Look for any signs of physical damage or overheating on the controller itself.
2. System Configuration Verification
Ensure your charge controller is properly matched to your solar panels and batteries:
- Verify that the controller’s voltage rating matches your system voltage (e.g., 12V, 24V, 48V).
- Check that the controller’s current rating exceeds the maximum current output of your solar array.
- Confirm that the controller is configured for the correct battery type (e.g., flooded lead-acid, AGM, lithium-ion).
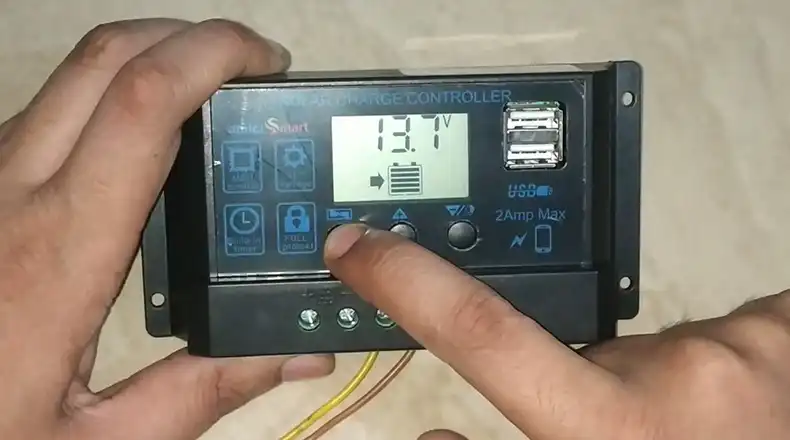
3. Using the Charge Controller Display
Many modern charge controllers feature built-in displays that provide valuable system information. Familiarize yourself with your controller’s display and the information it provides:
- Battery voltage
- Charging current
- Daily energy production
- System status indicators
Regularly monitoring these values can help you spot trends and identify potential issues before they become serious problems.
Advanced Diagnostic Techniques
If basic troubleshooting doesn’t reveal the issue, it’s time to dig deeper with more advanced diagnostic methods.
1. Using a Multimeter
A multimeter is an invaluable tool for diagnosing electrical issues in your solar power system. Here’s how to use it to test your charge controller:
- Set your multimeter to measure DC voltage.
- Measure the voltage at your solar panel output (before the controller).
- Measure the voltage at the controller’s battery output terminals.
- Compare these readings to what’s shown on the controller’s display (if available).
If there’s a significant voltage drop between the solar panel input and the battery output (accounting for normal voltage regulation), your controller may be faulty.
2. Load Testing
Performing a load test can help determine if your controller is properly regulating current:
- Connect a small, known load (like a 12V light bulb) to the load output of your controller.
- Monitor the controller’s response and the battery voltage.
- A properly functioning controller should maintain stable battery voltage while powering the load.
3. Bypass Testing
As a last resort, you can temporarily bypass the charge controller to see if it’s the source of the problem:
- Disconnect the controller from the system.
- Directly connect your solar panels to your batteries (only for a very short time and with extreme caution).
- If the batteries begin charging normally, this suggests the controller may be faulty.
Warning: This test should only be performed by experienced individuals and for very short periods to avoid damaging your batteries.
Common Causes of Charge Controller Failure
Understanding the common causes of charge controller failure can help you prevent issues and extend the life of your solar power system:
- Age and wear: Like all electronic devices, charge controllers have a limited lifespan.
- Environmental stress: Exposure to extreme temperatures, humidity, or dust can damage internal components.
- Lightning strikes or power surges: These can instantly fry a controller’s sensitive electronics.
- Incorrect installation: Improper wiring or configuration can lead to premature failure.
- Overheating: Inadequate ventilation or mounting in a hot location can cause damage over time.
- Corrosion: Moisture ingress can corrode internal components, especially in coastal areas.
- Water damage: Direct exposure to rain or flooding can destroy a controller.
Final Words
A well-functioning charge controller is critical to the health and efficiency of your solar power system. By familiarizing yourself with the signs of controller malfunction, performing regular maintenance, and knowing when to seek professional help, you can ensure your solar investment continues to provide reliable power for years to come.
Remember, when in doubt, always prioritize safety and consult with a professional. With proper care and attention, your charge controller will continue to be the unsung hero of your solar power system, silently managing the flow of energy from the sun to your batteries day after day.

![[ANSWERED] What Size Charge Controller for 1200W Solar Panel?](https://www.itekenergy.com/wp-content/uploads/2023/07/What-Size-Charge-Controller-for-1200W-Solar-Panel-768x428.webp)