Renogy DC to DC Charger Wiring Diagram: A Comprehensive Guide
Setting up a reliable power system in your vehicle is essential, especially if you’re venturing off-grid.
Renogy DC to DC chargers have become a popular choice for powering auxiliary batteries from both your vehicle’s alternator and solar panels.
Understanding how to wire your Renogy charger correctly is key to ensuring your setup works smoothly and efficiently.
Why Choose a Renogy DC to DC Charger?
Renogy’s DC to DC chargers are designed to keep your auxiliary battery charged while you’re on the move. They’re especially beneficial for those who rely on their vehicles for off-grid living, such as RV owners, van-lifers, and overlanders.
By drawing power from both your vehicle’s alternator and optional solar panels, these chargers ensure your batteries stay topped up, giving you peace of mind during your adventures.
Key Components of the Wiring System
Before diving into the wiring diagram, it’s essential to get acquainted with the main components involved in the setup:
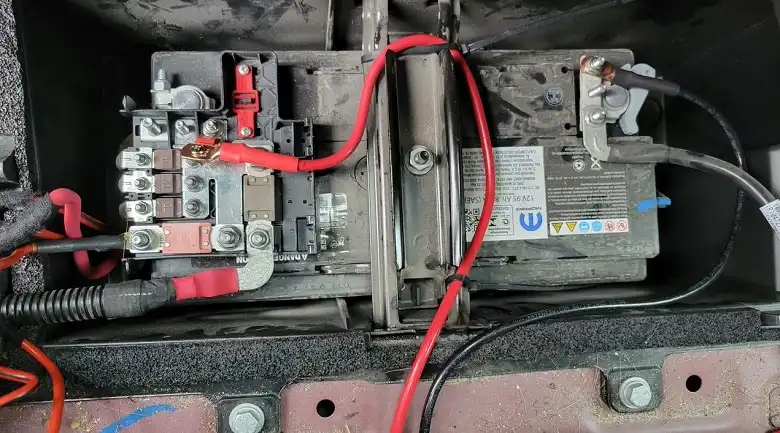
- Primary Battery: This is your vehicle’s main battery, responsible for starting the engine and powering your vehicle’s electrical systems.
- Auxiliary Battery: This secondary battery powers your off-grid appliances, such as lights, fridges, and inverters, ensuring your main battery doesn’t get drained.
- Solar Panels: An optional but valuable addition, solar panels provide a sustainable energy source, reducing reliance on your vehicle’s alternator.
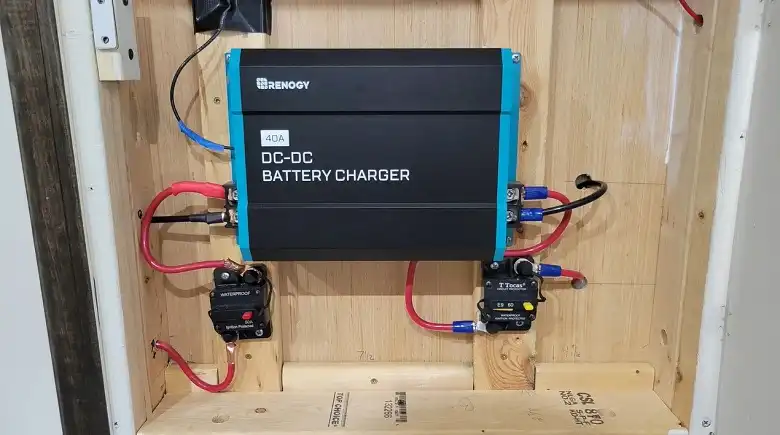
- Renogy DC to DC Charger: The heart of the system, this device manages the charging of your auxiliary battery, optimizing power from both the alternator and solar panels.
Understanding the Wiring Diagram
The Renogy DC to DC charger wiring diagram may appear complex at first glance, but breaking it down can simplify the process. Here’s how you can understand and implement it step-by-step:
1. Connecting the Primary Battery
The first step in your wiring setup is connecting the Renogy charger to your vehicle’s primary battery. This is done by linking the positive terminal of the main battery to the input of the charger.
It’s crucial to use a high-quality, heavy-duty cable for this connection, and installing an inline fuse close to the battery is essential to protect the circuit from potential overloads.
2. Wiring the Auxiliary Battery
Next, the output from the Renogy charger should be connected to the positive terminal of your auxiliary battery.
This connection is just as critical, requiring a secure fuse to be placed inline to prevent any electrical issues. This setup ensures that your auxiliary battery receives a consistent charge, whether you’re driving or parked under the sun.
3. Integrating Solar Panels
If you’re using solar panels, you’ll need to connect them to the solar input on the Renogy charger. This connection allows your system to harness solar energy, further optimizing the charging process.
Make sure that the solar panels are properly oriented and that the wiring is done correctly, with the positive and negative terminals connected to the appropriate inputs on the charger.
4. Proper Grounding
Both the primary and auxiliary batteries must be grounded to your vehicle’s chassis. Proper grounding is a critical safety measure, preventing electrical faults and ensuring the system’s stability.
Make sure that the ground connections are solid, clean, and free of corrosion to maintain efficiency and safety.
Installation Best Practices
When installing your Renogy DC to DC charger, several best practices can make a significant difference in performance and safety:
- Fuse Placement: Always install fuses as close to the battery terminals as possible. This placement minimizes the risk of short circuits, protecting both your batteries and the charger.
- Cable Sizing: Choosing the right wire gauge is essential to minimize voltage drop, especially if the cable run is long. Typically, a 4 AWG wire is recommended, but the exact size will depend on the current demands of your system.
- Follow Manufacturer’s Instructions: Renogy occasionally updates its wiring recommendations. It’s essential to consult the latest manual to ensure that you’re following the most current guidelines.
Common Mistakes to Avoid
Even with the best intentions, mistakes can happen during installation. Here are a few common pitfalls to watch out for:
- Incorrect Polarity: Mixing up the positive and negative terminals is a common error. Double-check all connections to ensure everything is wired correctly.
- Inadequate Grounding: Poor grounding can lead to electrical issues, so make sure all ground connections are secure and free of rust or debris.
- Ignoring Fuse Ratings: Using the wrong fuse can either fail to protect your system or cause unnecessary blowouts. Ensure that your fuses are rated correctly for your setup’s current.
FAQs
Can I use a Renogy DC to DC charger without solar panels?
Yes, the charger can operate with just your vehicle’s alternator. However, adding solar panels can provide additional charging power and efficiency.
What wire size should I use for my Renogy DC to DC charger?
The wire size depends on the length of the run and the current your system draws. Typically, a 4 AWG wire is sufficient, but check the charger’s manual for specific recommendations.
How do I know if my Renogy charger is functioning properly?
Check the indicator lights on the charger. Green usually indicates normal operation, while red or orange may signal a problem that needs attention.
Conclusion
Wiring a Renogy DC to DC charger correctly is vital to ensuring your off-grid power system operates efficiently and safely.
By following this guide and adhering to best practices, you can confidently set up your system, keeping your auxiliary battery charged whether you’re driving or soaking up the sun. For the best results, always consult the latest Renogy manuals and double-check your work to avoid common mistakes.

![What Size Inverter Do I Need for a Refrigerator? [Answerd]](https://www.itekenergy.com/wp-content/uploads/2024/04/What-Size-Inverter-Do-I-Need-for-a-Refrigerator-768x428.webp)