How To Use Junction Connectors For Solar Panels?
When it comes to setting up a solar panel system, understanding how to use junction connectors is crucial for both efficiency and safety.
Junction connectors, including the popular MC4 connectors, play a vital role in linking solar panels and transmitting the generated power to your electrical system.
In this guide, we’ll walk you through the essentials of using junction connectors for solar panels, from understanding the basics of junction boxes to properly wiring your panels and extending PV cables.
By mastering these techniques, you’ll be well-equipped to install or maintain your solar panel system with confidence. Let’s dive into the world of solar panel junction connectors and unlock the power of the sun for your energy needs.
Understanding Solar Panel Junction Boxes
Junction boxes are an essential component of any solar panel system. They serve as the central hub for electrical connections and play a crucial role in the overall functionality and safety of your solar setup. Let’s take a closer look at what junction boxes are and why they’re so important.
Purpose And Function
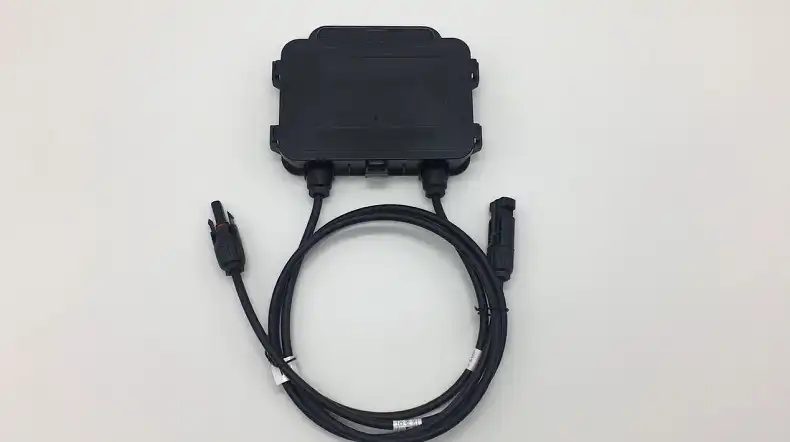
A solar panel junction box is an enclosure typically found on the back of a solar panel. Its primary purpose is to house and protect the electrical connections between the solar cells and the external wiring that carries the generated power to your system.
The main functions of a junction box include:
- Providing a secure connection point for the panel’s internal wiring
- Protecting the electrical connections from environmental factors like moisture and dust
- Housing bypass diodes that help maintain panel efficiency in partial shading conditions
- Offering a safe and accessible point for connecting the panel to the rest of the system
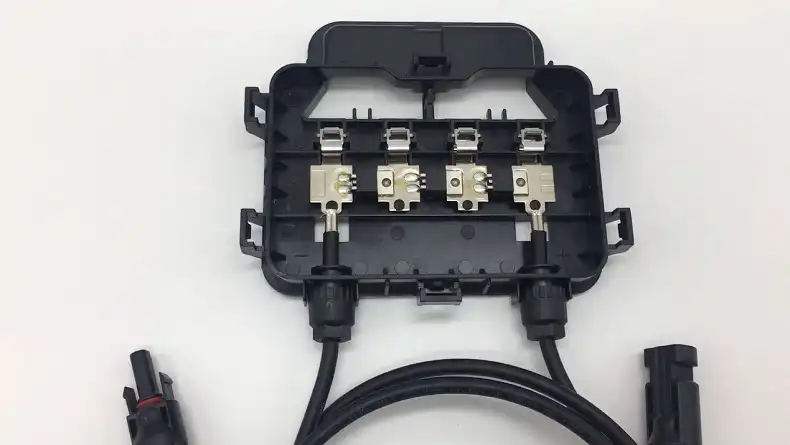
Components Of A Junction Box
A typical solar panel junction box consists of several key components:
- Enclosure: The outer casing that protects the internal components from the elements. It’s usually made of durable, weather-resistant plastic.
- Terminal blocks: These provide connection points for the panel’s internal wiring and the external cables.
- Bypass diodes: These small electronic components help maintain power output when part of the panel is shaded or damaged.
- Cable glands or strain relief connectors: These secure the cables entering and exiting the junction box, preventing water ingress and providing strain relief.
- Sealant: A silicon-based adhesive is often used to attach the junction box to the back of the solar panel and ensure a watertight seal.
Types Of Junction Boxes
Junction boxes can vary depending on the manufacturer and the specific requirements of the solar panel. Some common types include:
- Standard junction boxes: These are the most common type, featuring basic terminal connections and bypass diodes.
- Smart junction boxes: These more advanced models may include additional features like monitoring capabilities or micro-inverters.
- IP-rated junction boxes: These are designed to meet specific Ingress Protection (IP) standards, indicating their level of protection against dust and water. For example, an IP67-rated junction box is dust-tight and can withstand temporary immersion in water.
Connecting the Junction Box to the Solar Panel | Step By Step
Now that we understand the basics of solar panel junction boxes, let’s dive into the process of connecting them to your solar panels. This step is crucial for ensuring proper functionality and longevity of your solar system.
Step 1: Attaching The Junction Box To The Panel
Most modern solar panels come with pre-installed junction boxes. However, if you need to attach one yourself, follow these steps:
- Clean the back of the solar panel where the junction box will be attached.
- Apply a generous amount of silicone adhesive to the back of the junction box.
- Carefully position the junction box on the panel, ensuring it aligns with any pre-drilled holes or markings.
- Press firmly and hold in place for several minutes to allow the adhesive to set.
- Allow the adhesive to cure fully according to the manufacturer’s instructions before proceeding.
Step 2: Wiring The Internal Connections
Once the junction box is securely attached, it’s time to make the internal connections:
- Open the junction box carefully, following the manufacturer’s instructions.
- Identify the positive and negative terminals inside the box.
- Connect the solar panel’s internal positive and negative leads to their respective terminals.
- If your junction box includes bypass diodes, ensure they are correctly installed across the solar cell strings.
- Double-check all connections to ensure they are tight and secure.
Safety considerations
When working with solar panel junction boxes, always prioritize safety:
- Ensure the solar panel is not exposed to sunlight during installation to prevent live electrical currents.
- Wear appropriate personal protective equipment (PPE), including insulated gloves and safety glasses.
- Use proper tools designed for electrical work to avoid damaging components or risking electric shock.
- Follow all local electrical codes and regulations when making connections.
- If you’re unsure about any step in the process, consult a professional solar installer.
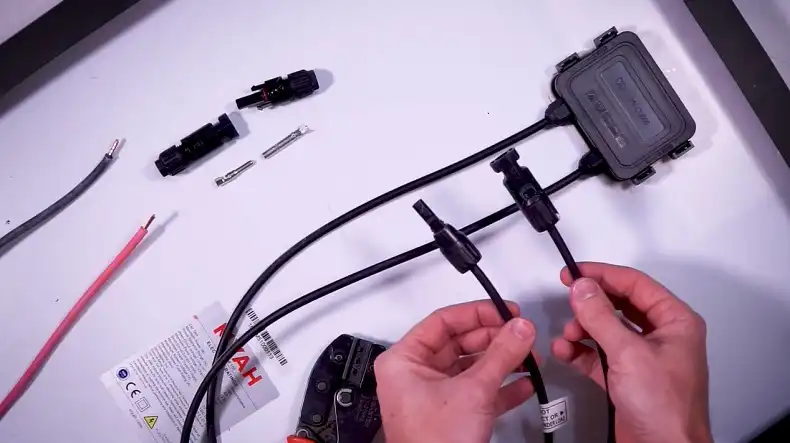
Using MC4 Connectors
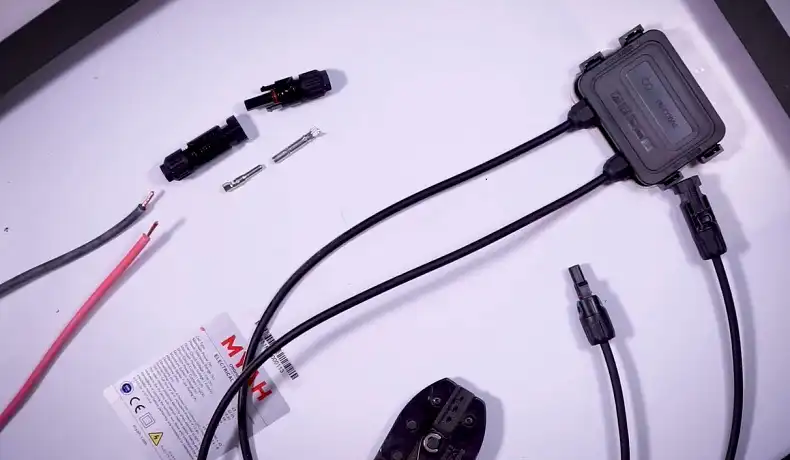
MC4 connectors have become the industry standard for connecting solar panels due to their reliability, ease of use, and weather-resistant properties.
Understanding how to properly use these connectors is essential for anyone working with solar panel systems.
What Are MC4 Connectors?
MC4 stands for “Multi-Contact, 4mm²”. These connectors are designed specifically for photovoltaic systems and are used to connect solar panels to each other and to the rest of the solar power system. They’re known for their:
- Weatherproof design
- Snap-lock mechanism for secure connections
- Ability to handle high voltages and currents
- Durability in outdoor conditions
Male Vs. Female Connectors
MC4 connectors come in male and female varieties:
- Male connectors: These have protruding metal pins and are typically associated with the negative (-) lead.
- Female connectors: These have recessed metal sockets and are usually associated with the positive (+) lead.
It’s crucial to match male and female connectors correctly to ensure proper and safe connections.
Proper Connection Techniques
To connect MC4 connectors:
- Align the male and female connectors.
- Push them together firmly until you hear a clicking sound, indicating they’re locked in place.
- Gently tug on the connection to ensure it’s secure.
- If using in outdoor settings, consider adding weatherproof caps to any unused connectors.
Disconnecting MC4 Connectors Safely
Disconnecting MC4 connectors requires a special tool to prevent accidental disconnections:
- Use an MC4 disconnect tool, which looks like a small plastic fork.
- Insert the prongs of the tool into the slots on the side of the female connector.
- Squeeze the tool to release the locking mechanism.
- While holding the tool, pull the connectors apart.
Never try to separate MC4 connectors by pulling on the cables or using pliers, as this can damage the connectors and compromise their weatherproof seal.
Wiring Solar Panels Using Junction Connectors
Once you’ve mastered the use of MC4 connectors, it’s time to learn how to wire multiple solar panels together. The way you connect your panels can significantly impact the voltage and current output of your system. Let’s explore the two main wiring configurations: series and parallel.
1. Series Connections
When you connect solar panels in series, you increase the voltage while keeping the current constant. Here’s how to do it:
- Connect the positive (+) terminal of one panel to the negative (-) terminal of the next panel.
- Continue this pattern for all panels in the string.
- The remaining free positive and negative leads at the ends of the string will connect to your charge controller or inverter.
Benefits of series connections:
- Increases overall voltage, which can be beneficial for long cable runs
- Allows for smaller gauge wire to be used
2. Parallel Connections
Parallel connections increase the current while keeping the voltage the same. To wire panels in parallel:
- Connect all positive (+) terminals together.
- Connect all negative (-) terminals together.
- The combined positive and negative leads then connect to your charge controller or inverter.
Benefits of parallel connections:
- Increases overall current output
- Maintains a lower voltage, which can be safer to work with
3. Using Combiner Boxes For Multiple Panels
When working with multiple panels or strings of panels, a combiner box becomes essential:
- A combiner box allows you to safely connect multiple strings of panels together.
- It typically includes circuit breakers or fuses for each string, providing overcurrent protection.
- The output of the combiner box then feeds into your charge controller or inverter.
Steps for using a combiner box:
- Mount the combiner box in a convenient location near your solar array.
- Run the positive and negative leads from each string into the combiner box.
- Connect these leads to their respective circuit breakers or fuse holders.
- Connect the main output of the combiner box to your charge controller or inverter.
Extending PV Cables with MC4 Extension Cables
Sometimes, the built-in cables on your solar panels aren’t long enough to reach your charge controller or combiner box. This is where MC4 extension cables come in handy. Let’s explore how to choose and use these cables effectively.
1. Choosing The Right Length
Selecting the correct length for your extension cables is crucial:
- Measure the distance from your solar panels to your combiner box or charge controller.
- Add about 10-15% extra length to account for routing and slack.
- Remember, longer cables can lead to voltage drop, so try to keep them as short as practically possible.
2. Proper Installation Techniques
Installing MC4 extension cables correctly ensures optimal performance and safety:
- Route cables neatly and securely, using UV-resistant cable ties or conduit where appropriate.
- Avoid sharp bends in the cable, which can damage the internal wires over time.
- Keep cables away from areas where they might be stepped on or damaged by wildlife.
- Use weatherproof junction boxes for any connections that aren’t made with MC4 connectors.
3. Common Mistakes To Avoid
Be aware of these common pitfalls when working with extension cables:
- Mismatching connector genders: Always ensure you’re connecting male to female.
- Overlooking voltage drop: If you need very long extensions, consider using a larger gauge wire.
- Ignoring local codes: Some areas require conduit for all external wiring.
- Forgetting to secure cables: Loose cables can be damaged by wind or wildlife.
Maintenance and Troubleshooting
Proper maintenance of your solar panel system, including the junction connectors, is crucial for ensuring long-term efficiency and safety. Let’s look at some key aspects of maintenance and how to troubleshoot common issues.
Regular Inspection Of Junction Boxes And Connectors
Periodic checks can prevent many problems before they start:
- Visually inspect all junction boxes and connectors for signs of damage or wear.
- Check for any loose connections or cables.
- Look for signs of water ingress or corrosion.
- Ensure all cable entries into junction boxes are properly sealed.
Aim to perform these checks at least once a year, or more frequently in harsh environments.
Addressing Common Issues
Here are some issues you might encounter and how to address them:
- Loose connections:
- Tighten any loose screws or terminals in the junction box.
- If MC4 connectors feel loose, they may need replacement.
- Water ingress:
- If you find moisture inside a junction box, dry it thoroughly and identify the entry point.
- Replace damaged seals or gaskets.
- Consider applying additional weatherproof sealant around the box.
- Corrosion:
- Clean any corrosion with a wire brush or electrical contact cleaner.
- If severe, the affected parts may need replacement.
- Damaged cables:
- Replace any cables showing signs of damage or wear.
- Use UV-resistant cables for all outdoor wiring.
When To Seek Professional Help
While many maintenance tasks can be DIY, some situations call for professional assistance:
- If you’re uncomfortable working with electrical systems.
- When dealing with high-voltage systems (typically over 50V).
- If you notice significant drops in system performance that you can’t explain.
- For any repairs that might affect your system’s warranty.
Conclusion
Understanding how to use junction connectors for solar panels is a crucial skill for anyone involved in solar energy systems, whether you’re a DIY enthusiast or a professional installer.
We’ve covered a lot of ground in this guide, from the basics of junction boxes to the intricacies of wiring configurations and maintenance.
Remember, while working with solar panels can be rewarding, it also involves dealing with electrical systems. Always prioritize safety, follow local codes and regulations, and don’t hesitate to seek professional help when needed.
![[Explored] Can You Short Out a Solar Panel?](https://www.itekenergy.com/wp-content/uploads/2023/07/Can-You-Short-Out-a-Solar-Panel-768x428.webp)